Birthday Daisies & Confetti Card

A Step-by-Step Guide to Stitching the "Birthday Daisies & Confetti" Card
Hello and welcome back to the blog!
There is nothing quite as special as receiving a handmade birthday card. It’s a gift that shows true thought and care, and it often becomes a keepsake long after the celebration is over. Today, I want to help you create that special gift with my newest paper embroidery pattern, "Birthday Daisies & Confetti."
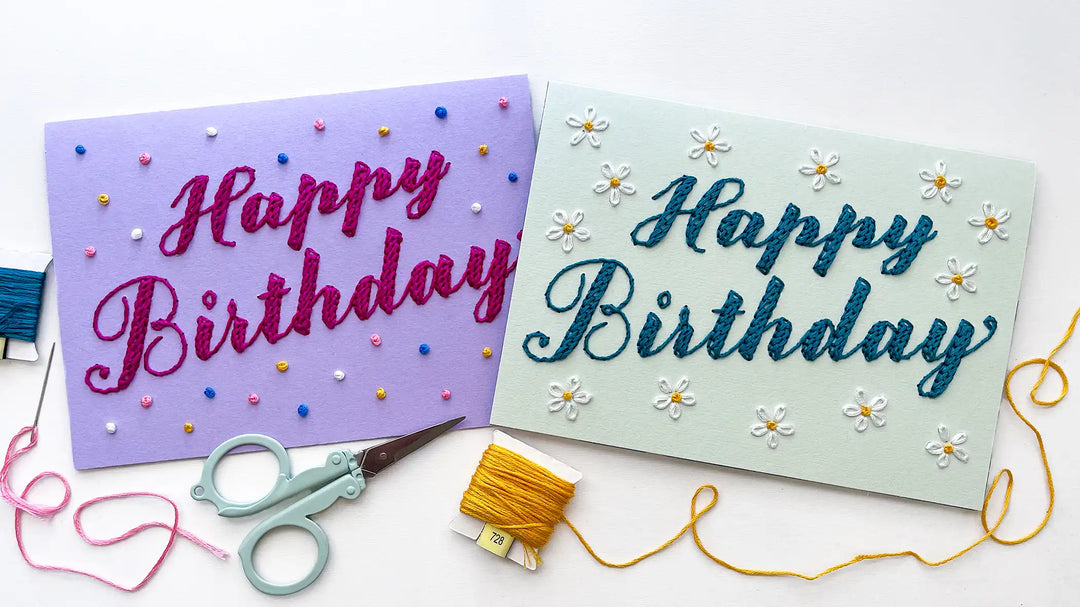
This pattern is designed to be a joy to stitch and includes two beautiful options: a sweet floral version with delicate daisies, and a fun, modern version with a pop of colorful confetti.
To make the process as easy and enjoyable as possible, I’ve created a full, step-by-step video tutorial. You can follow along with me as I guide you through creating the beautiful daisy version from start to finish.
Watch the Full Tutorial
Gather Your Supplies
To create your own "Birthday Daisies & Confetti" card, you will need a few key supplies:
- The "Birthday Daisies & Confetti" Pattern: You can get the digital pattern in the shop, which includes both the daisy and confetti designs.
- Cardstock: A sturdy cardstock between 80-110lb is recommended.
- Embroidery Floss: Your favorite brand and colors!
- Tapestry Needles: Sizes #24 and #26 work well for this project.
- A Piercing Tool: My 3-in-1 awl or a similar tool to pierce the holes.
- Foam Pad: Protect your awl and surface.
- Scissors & Tape
Step 1: Creating the Elegant Lettering
A Pro-Tip Before We Start: We always begin with the lettering for this design. It involves some beautiful weaving techniques, and stitching the letters first will prevent any frustrating thread snags later on. It's the secret to a smooth and relaxing process!
Part A: The Whipped Back Stitch Foundation
For this step, your pattern calls for 4 strands of floss. The easiest way to do this is to cut a length of thread consisting of 2 strands, fold it perfectly in half, and then thread the looped end through your needle. This gives you four working strands and a neat starting point. I recommend using a #26 tapestry needle for this part.
First, we'll create the base of our letters with a simple back stitch.

As you stitch, here’s a helpful tip: follow the path you would take as if you were writing the letters by hand. This will help the strokes overlap beautifully and naturally.
Once your back stitch foundation is complete, it's time to "whip" it! This is what gives the stitch its smooth, raised appearance. Switch to a slightly larger #24 tapestry needle and use 6 strands of floss. You will weave this new thread under each back stitch without piercing the paper, creating a beautiful twisted effect.

Part B: Adding Dimension with the Raised Stem Stitch
Now, let's move on to the bolder sections of the letters using a technique called the Raised Stem Stitch. Don't be intimidated by the name! This stitch looks incredibly impressive, but it's actually a simple and relaxing weaving motion.
First, create a base of simple horizontal straight stitches as indicated in your pattern.

Once the base is ready, you'll work from the bottom up. Weave your needle over and under the horizontal stitches in a continuous looping pattern. The final result is a stunning, textured stitch with gorgeous dimension!

Finally, to make the letters pop, outline the shape with a simple back stitch using 4 strands of thread. This adds definition and a clean, finished look.
Special Note on the letter 't': To complete the straight stitch for the crossbar of the ‘t’, make sure to pass your needle underneath the raised stem stitches of the vertical line. This tucks it in neatly for a seamless look.

Step 2: Adding the Daisies and Confetti
Stitching the Daisy Petals (Lazy Daisy Stitch)
It’s time for the adorable daisies! We'll use a Detached Chain Stitch, also known as the Lazy Daisy Stitch. It's super simple:
- Come up through a hole at the base of a petal.
- Go right back down through the same hole, leaving a small loop of thread on top.
- Come up through the hole at the tip of the petal, making sure your needle is inside the loop.
- Gently pull the thread until the loop forms a perfect little petal shape.
- Go back down through the hole at the tip to secure it. Repeat for all petals!

Finishing with French Knots
The final touch for the daisies and the main feature of our confetti version is the classic French Knot. The centers of the daisies use a smaller knot, while the confetti version uses chunkier knots for more texture—your pattern will specify the number of wraps for each.
Simply wrap your thread around your needle the specified number of times, then go back down the same hole you came up through. This will create a cute, textured knot.

Your Beautiful Finished Card!
And just like that, you've created a gorgeous, handmade birthday card that is sure to be cherished.


If you'd like to give your card an extra professional touch, you can cover the stitches on the back. I have a full video showing that process, which you can find right HERE.
I hope you enjoyed this tutorial and feel inspired to create something beautiful. There is so much joy to be found in making something with your own two hands.
If you are ready to start stitching, you can find the "Birthday Daisies & Confetti" pattern in the shop. I would be absolutely thrilled to see your finished card, so please be sure to share it on social media and tag me @FlourishingFibers!
Happy stitching,
Sara